Throughout this module, we had the opportunity to engage further with the technology and the techniques used in the creation, recording and distribution of music. For our assessment focus, I needed to concentrate on identifying, guiding and supervising the creation, performance and recording of someone else’s original music.
To begin the module, I originally paired up with my classmate Richard, who had an original composition which he could record. Unfortunately, due to COVID, after only being able to record the guitar and the assessment deadline very close, Richard had to isolate for two weeks which meant not being able to finish the track. However, I was able to receive another track that I could continue to mix and master.
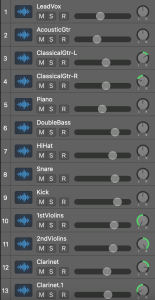
After receiving the project stems, I imported the audio into a new project and began to listen to the song. After familiarising myself with the song, I named and re-ordered the tracks so that they were easier to find. I placed the vocals at the top, then guitars and piano, drums, violin, and wind and woodwind instruments. By doing this, it makes the tracks easier to find and access.
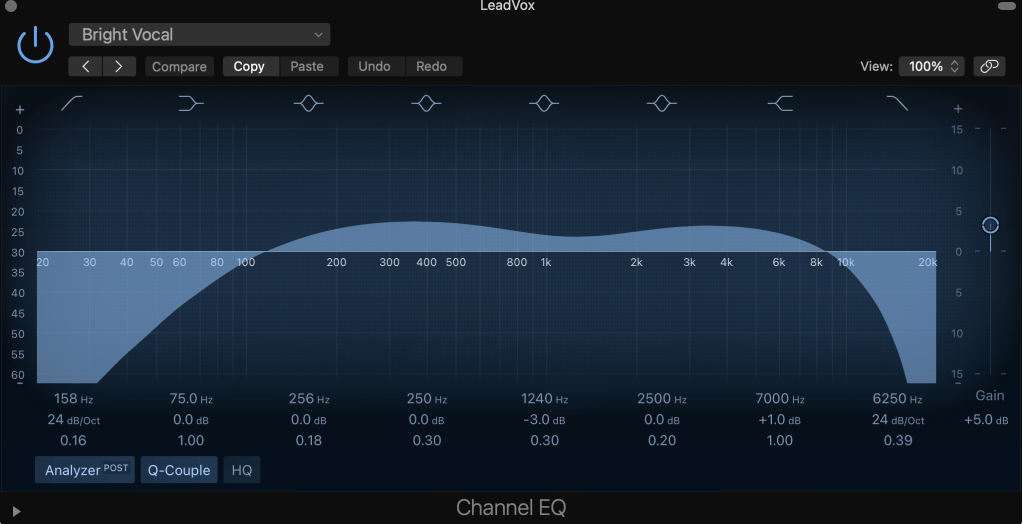
Once this was completed, I began to balance to the volume of the tracks to avoid any abnormal changes in the levels that will make the track clip. When I had a balance that I was happy with, I began with EQ, which cuts out any unwanted frequency. I used EQ on all of the tracks to enhance the colour of the instruments and make a clear mix where you can hear all the tracks.
When using the EQ, I used the analyser that showed the frequencies in the individual instruments. This was effective as it allowed me to understand where the most frequencies were coming from in the instrument and edit it accordingly. With tracks such as the piano, I edited the middle and high frequencies that created a bright piano and lifted the track and added more shape into the mix. However, for the kick drum, I repaired the frequencies by decreasing the middle and lower end by adding a low pass filter. By adding the low pass filter this cut off the lowest frequencies that appear too aggressive. This helped the kick drum poke through the song further. In addition to this, I added a low and high pass filter to the tuba that differentiated the variation between the kick and the tuba as they as both low-frequency instruments. Without these filters, the mix would become very muddy and swamped in low-end.
When I was happy with the EQ, I moved onto compression. Compression controls the dynamics in the tracks, as it is not unusual for a recorded track to have inconsistencies in volume. When recording guitars can be played softer or louder at certain points, or vocalists can move closer or further away from the microphone. I used a compressor plugin with all of the tracks to make sure the dynamics were suitable. Compression is more complex than EQ as it has more areas to focus on, such as threshold, ratio, and attack and release. Each area plays an important part. The threshold controls when the compressor comes into action, whereas the ratio controls how much of the compression is the happen past a certain point.
In the master track, the clip was clipping, which meant the track was too loud. To improve that, I added a compressor on the plugin for the master track. This reduced the threshold and compressed any signal that reached that area. I began to edit the volume again, to let certain instruments poke out in the mix after getting lost in the editing process. I increased the kick drum and the bass as they had been overpowered by the other instruments.
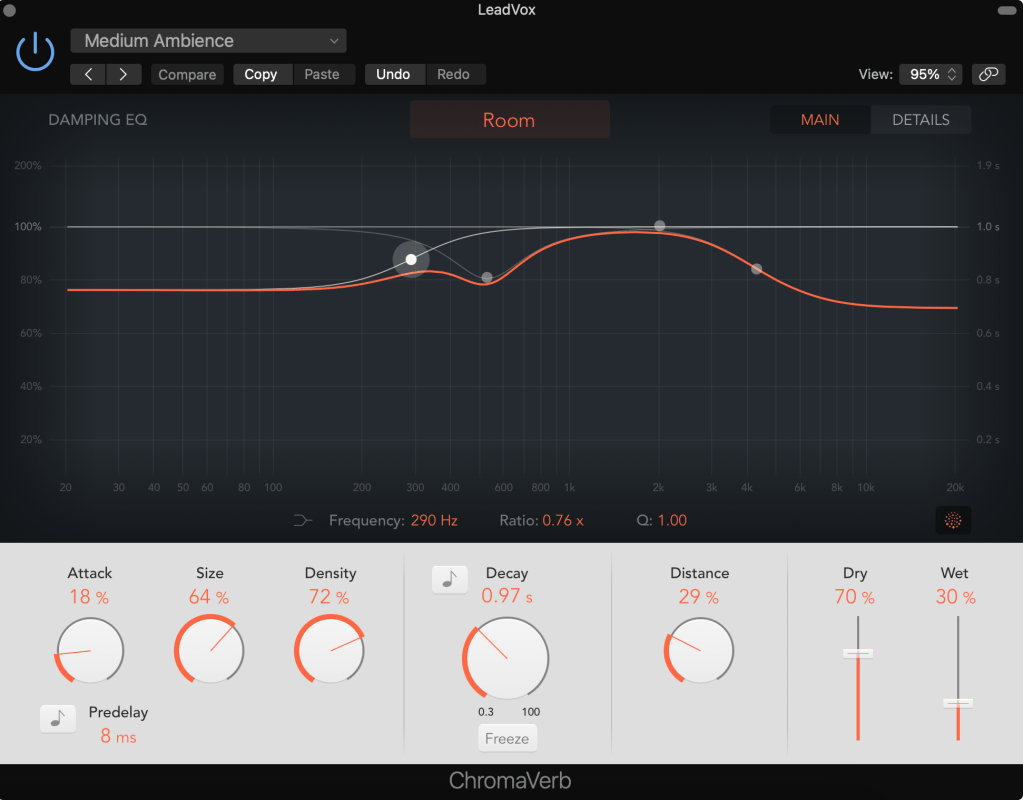
Next, I began to add effects onto some of the tracks. The main effect I added was reverb. Reverb (reverberation) is a type of delay effect which adds echo onto the track. For the vocals, I added reverb known as ‘ChromaVerb’. In this plugin, 4 main sections that work together for the perfect reverb. Pre-delay, which controls the time between the signal and the reflection, works by turning up the pre-delay which increases the size of the “room” and reflectivity time. Reflectivity, which affects the reflection of the room and density or time that controls how long the reverb lasts for. The last section is output, that gives control over the wet/dry mix. When working with the wet and dry signal this can help to find a perfect balance for the mix.
On the classical guitar, there was a lot of unwanted noise. To reduce the background noise I added a noise gate to the track. A noise gate works by reducing signals below the threshold level. This allows the chosen parts of the sound to pass through onto the track.
When I was happy with the track, I bounced the project to MP3 and opened the file in Izotope Ozone. Once I uploaded the file into Ozone I began to work on my master track. I began with the imager, which analyses the balance of the audio in both stereo and mono. The track was well balanced in both of these fields, having a good stereo width, which didn’t need much editing.
I then moved onto a feature called mix assistance, which allowed me to get a good static mix with the help of the program. I selected a modern module to work for a CD, and the mix assistant will listen to the track and add the appropriate effects. I was then able to make any adjustments to the effects, to fit the track.
Next, I added dynamic EQ, which makes EQ boosts and cuts that respond to the dynamics of the audio. Dynamic EQ is a plugin which allows compression and subtle EQ. Dynamic EQ can make boosts and cuts when frequencies are too loud or quiet. Along with this, I used a Multiband compressor that controls the dynamic range of the audio. This gives the option to compress some frequencies. However, the slight difference between dynamic and Multiband is dynamic allows more bands, which means more area to control. When editing the dynamics, the dynamics focused on multi-frequency attenuation. When the signal reached a threshold of -12 dB the signal started compressing that makes the song sound more polished.
To listen to the track properly, I selected “mid/side” which allowed me to separate the left, right, and centre channels so I can hear the outputs. Separating the channels allows me to add effects on separate areas of the track.
One thing I noticed was that when I mixed for mono, the piano was lost in the mix. As a result of this, it would have been a good idea to go back into the original mix and boost the gain on the piano track. This way, the master track would have been better in both stereo and mono.
When I was happy with the overall mastering, I then bounced the file so I could begin my CD master. To do this, I added the master file to Izotope and added a clean CD effect. This time I added the Multiband compressor. I did the same for the streaming master, although, I had to drop the output peak RMS (root mean square) and set the volume to -14 LUFS. I did this because streaming services compress the song to the playback levels for streaming services. If the track is at the wrong LUFS it may mean the volume is too high or too low.
For the TV mix, I add high-end and low-end EQ to enhance the balanced elements of the mix. This also prevents any distortion that could come through the TV speakers. Again, just like the stream master mix, I had to set the output RMS to -24 LUFS. This seemed to make the volume very low, however, the TV services compress the audio that will increase the overall volume.
Overall, I thoroughly enjoyed this module. It has been difficult, however, it has been interesting to learn new knowledge about the mastering process. I have learnt the mastering processes for not only an intricately mastered track but also for CD, streaming and television services. This has allowed me to use this for my own recordings so I can release them on a streaming service correctly.
